360° videos offer a unique, immersive experience – but precisely because they function so differently from classic video formats, there are also many pitfalls in production. Whether for Marketing, Training or Storytelling – those who know typical mistakes can avoid them deliberately and exploit the full potential of the technology.
In this post, we share as experienced XR Agency 10 common practical mistakes and how to elegantly avoid them.
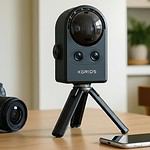
Stitching errors, also visible transitions between camera views in a 360° video, used to be considered one of the biggest technical problems in production. Thanks to technological progress, they are now largely a thing of the past. Modern 360° cameras how the Insta360 Pro 2, Qoocam 8K or GoPro Max utilize advanced stitching algorithms and so-called Optical Flow Technology, to seamlessly blend individual perspectives in real-time or post-processing.
Nevertheless, errors can still occur in individual cases – but usually no longer due to bad software, but rather due to unfavorable Camera placement or Choice of theme.
When stitching problems still occur today:
The topic of„dirty stitching seams“is rarely a real problem today – if the camera is positioned sensibly and modern software is used. Anyone who consciously places their subject outside the stitch lines and maintains sufficient distance can usually rely on clean results. And if there are discrepancies, it's worth taking a look at the Camera App – there, you can often select the right stitching variant with just a few clicks.

Even if Stitching problems today are rarer, one still happens surprisingly often – the Stand or the Crew appears in the picture. Because 360° cameras The camera literally films everything – including downwards and behind itself. Anyone who doesn't think about their own visibility while shooting or doesn't position the tripod cleverly will experience an unpleasant surprise when first viewing the footage.
While this is sometimes tolerable in documentary productions (e.g., for deliberate transparency of the medium), it seems in Marketing-, Training or Image videos often unprofessional – especially when Camera Operators or equipment clearly visible.
Typical causes:
Place it cleverly – the nadir is your friend
The area directly below the camera (the so-called Nadir) is common 360° cameras already difficult or not at all visible, as there the stitch lines meet. High-quality cameras like the Insta360 Pro 2, Kandao obsidian or GoPro Max offer factory-optimized stitching areas, where the Stand optically greatly reduced or already masked.
Practical Tip: Position the tripod centered under the camera – and it’s best to use narrow, „360-friendly“Static models (e.g., the Invisible Selfie Stick System from Insta360).
Most 360° cameras can be conveniently by App or Bluetooth start. Use this function to get out of sight before you start recording. Some apps also offer a Start Timer or the ability to automatically record multiple clips while staying out of view.
if the Stand or you yourself got caught on camera, it's not the end of the world—but it does mean extra work. Tools like Adobe After Effects with Mocha VR), Insta360 Studio or DaVinci Resolve Studio with Patch Replacer enable very precise object removal today. It's important that you remember to film a short sequence without distracting objects during the recording – as a so-called „Clean Plate“This can then be used as a basis for clean retouching.
A common and simple solution: the so-called Nadir Patch. This makes the visible Stand in the lower image area by a branded logo, a graphic circle, or a neutral texture. In many cases, that is perfectly sufficient – especially with Web Tours or Social media formats.
In High-end productions are there also hovering 360° cameras for use – for instance with Drones or Robotic Arms. This technique produces particularly spectacular shots, but also requires special know-how, so that, for example,. Rotors or outriggers are not visible. The same applies here: where you film, you will be seen – creative Camera positioning is crucial.
360° videos Forgive no carelessness – this applies especially to visible technology or people who don't belong in the picture. Modern Cameras and Software significantly ease retouching, but it's best to work cleanly during the shoot and plan ahead. A well-placed Invisible Stick or Nadir Patch saves a lot of time later – and ensures a professional impression.
In conventional video productions, fast Camera pans or rhythmic Cut a proven stylistic device to Dynamik to generate. But in the world of 360° videos doesn't work as usual – and can even have the opposite effect. Fast Camera movements or abrupt Cut often appear disorienting or overwhelming in immersive perception. Some viewers even react with Motion Sickness, as their visual perception does not match their physical movement (keyword: „visual conflict“).
A common mistake is also the temptation to operate the camera „classically,“ even though 360° Content through static or strategically placed Perspectives translates to: is a standout. Pans or camera movements not only lose their impact in 360° – they rob the viewer of the freedom to orient themselves in the space.
Why fast movements in 360° are problematic:
Purposefully position the camera in a central location that offers an overview of the scene. If a Movement necessary (e.g., on a Dolly or in a vehicle), then only with high-quality Gyro stabilization or special tools like Insta360 FlowState or Kandao SuperSteady. Alternatively, post-stabilization in software like ReelSteady for GoPro-Material) or Adobe Premiere Pro with VR Stabilizer an.
Ideally, one remains 360° scene uninterrupted, so that the viewer can fully grasp the environment. If Cut necessary (e.g., for Location change or chapter structure) then:
Since you as a filmmaker are no longer with classic Frame crops working, you have to carry out the action in the space itself choreograph. Movements of persons, auditory stimuli or targeted Light are ideal means to the User's view to steer—without any camera movement. This concept is called Spatial Storytelling and is essential for Immersive Content.
Instead of fast Cut to use, rely on a varied Action in Spacee.g., multiple characters doing different things, or Events, which take place one after another in different locations in the room. This creates natural movement – but the viewer decides for themselves what they want to see of it.
If Movement used consciously – e.g., in a Camera movement through a building or on a bicycle – pay attention to:
In 360° videos is movement a sensitive topic: too much of it quickly appears unnatural – too little makes the experience static. The key is that you don't try to use conventional Film Rules on the 360° Format to transmit. Instead, the following applies: Rather calm, well-thought-out scenes – and for that the full effect of Immersion unfold. Good 360° videos aren't hectically cut, but spatially staged.
Bye 360° recordings It is often not possible to work with a perfectly lit set – especially because classic Light sources in the scene would be visible. The result: uneven Brightness, hard Shadow on one side or flat lighting without Contrast. Unlike in classic film, you can't simply light from behind or work with spotlights – the camera sees everything.
But: A not perfect Lighting is not automatically a dealbreaker. On the contrary – with a well-thought-out Color Grading in the Post-production can be extracted from average material. However, it requires 360° Material a different approach than the classic one Footage. Find out here how to optimize lighting for 360° video.
Many professionals 360° cameras offer flat color spaces (e.g. Insta360 LOG), which at first glance seem to offer little Contrast and Color have – but significantly more leeway when it comes to Color correction offer. This allows you to Lights and Shadow customize precisely without losing any details.
360° Material is spherical (equirectangular) and has a very specific Image distortion – which is why selective masking, as used in traditional videos, is only effective to a limited extent. Avoid overly aggressive „Spot corrections“and focus on global Color- and Contrast adjustments.
Classic Vignettes or linear gradient filters are effective in 360° room unnatural, as they do not adhere to the spherical projection orient yourself. If you Light guidance simulate, use targeted instead Spherical Masks in programs like DaVinci Resolve Studio or Adobe After Effects with Mettle SkyBox/Immersive Tools).
Often the main problem lies with the Lighting not in the brightness, but in the Color cast – e.g. through Artificial light or dimly lit environments (e.g. Daylight + Neon. A targeted White balance with a focus on „Neutral gray“can greatly improve the overall picture.
Many 360° videos appear „flat“ because the Contrast is too low. Especially with Immersive Content is a light push of the Contrast curve meaningful – but without exaggerated black or white values, as this will lead to the loss of important image areas or an unnatural appearance.
Strong Color saturation can in 360° room appears artificial. Use Color Grading, to atmospherically highlight specific areas (e.g., warm tones for interiors or cool blues for technical settings), but avoid garish color bands or overdone filter looks.
Not every scene can be perfectly lit on set – nor does it need to be. With a well-thought-out Grading Workflow Can you list many weaknesses in Footage conceal or even showcase them creatively. It is important that you the special characteristics of 360° Material consider and work with tools that are for spherical content designed for. Good Light is ideal for filming – but good Post-processing is at least as important today.
In classic films, the Camera, what the audience sees. At 360° videos does this control cease to exist – the viewers choose their Gaze direction itself. This can lead to Immersion contributes, but often leads to Disorientation, when there's no clear focus or indication of relevant content.
Without visual or auditory cues, it can happen that Main scene is overlooked or viewers are distracted by unimportant areas of the image. This not only diminishes the Effect ...of production, but also reduces the Information content.
Why a Clear Center is Needed:
Movement attracts attention. When an object or person moves across the room – for example, from left to right or diagonally – our eyes follow automatically. This type of Gaze direction works without cutting or zooming and is particularly effective.
Example: One person enters the room from the side, while a second person is already there. Look positions itself as if it were natural Interaction.
360° videos can be excellently combined with spatial audio combine. A sound from the right – for example, a Voice, one Signalton or a Door knock – diverts the Look intuitive in this direction. This method works particularly well in scenes with multiple Events.
Tip: Spatial tone can also be used as a stylistic device to Tension to generate or the next Action step to announce.
Lager pulls the Look dark areas recede into the background. Those who with Light works – whether already during filming or through Color Grading – can specifically a Gaze direction default. It is important that the light Of course works and not like an overexposed spotlight effect.
Example: A character is in a in the hellen area positioned, while the rest of the scene remains in soft focus. This automatically creates a visual center.
The Environment can be designed to the Look unconsciously steers. Routing, View axes of figures, Contrasts or striking Colors help with a Focus point to establish. Also Props or Objects with motion can serve as visual markers.
Many Player and Headsets show at the beginning automatically the „Front view“It is recommended to place the main entry point into the plot precisely there – or right at the beginning, to give the impulse to look around with an acoustic or visual stimulus. Important Scenes should not take place directly behind the spectators.
In interactive formats – approximately WebVR Environments – help animated Icons, Hotspots or subtle graphical elements along with them, which Attention to focus on specific points. Especially when Learning content or guided tours have such markers proven effective.
A good one 360° video doesn't need to be hectic Camera work but a clear Staging. Anyone who consciously designs a space, acoustic and visual stimuli cleverly placed and foregoes unnecessary distractions, creates a immersive experience with clear Focus. Good Vision guidance Doesn't seem intrusive, but rather intuitive.
Many 360° videos start anywhere – without Focus, without visual center, without dramatic introduction. The effect: Viewers open the video and see... a wall, the floor, or an irrelevant part of the scene. This often leads to important Plot elements missed or skipped directly.
The problem affects both YouTube VR, Web player as well as VR headsetsMost platforms show the front of the camera when starting – that is, the direction that is used during shooting as „Forward View“ was has been defined. Those who do not consciously choose or misalign these waste valuable Attention.
Modern Cameras how the Insta360 Pro 2, GoPro Max or Qoocam 8K enable, already at the Turn or at the latest when Export die Starting view direction to establish. Use this option specifically to make the most important things immediately visible – for example, a Figurine, one Object or a visually strong opening. Alternatively, the gaze direction can also be adjusted later in video editing software such as After Effects, Premiere Pro or DaVinci Resolve adjusted.
Instead of immediately Action To start, a short intro (2–3 seconds) with a calm scene helps the audience Time to orient to give. After that, the actual event can begin – ideally where the Look already resting anyway.
Whoever Start screen chooses subconsciously, loses viewers – often within the first few seconds. A targeted „Forward View“ achieves Orientation, lowers the Entry hurdle and increases the chance that the Video watched until the end.
A technically perfect 360° video is of little use if it doesn't make sense in the Application context embedded. Many productions are viewed in isolation – without Interaction, without Information structure, regardless of the End device or the Target group. This often makes the video seem like a nice gimmick – but not like a well-thought-out tool for Marketing, Training or Presentation.
Especially in Corporate Communications or Education we often see: The video has been produced – but it's missing the Embedding into a Website, App or didactic structure.
Instead of viewing the video as a single element, it should be part of a larger Concepts to be. With tools like 3DVista, Thinglink or Unity can be 360° videos with Information point, Quiz, Navigation elements or Jump links enrich – this creates Added value and Structure.
Will the Video in the browser, on a Smartphone or in a VR goggles viewed? Depending on the platform, for example, the Resolutionthat Aspect ratiothe Codec or the Navigation adjusted. A 360° video on a Tablet needs others Operating logic as in one Headset.
A Training video for nurses must be structured differently than a Property tour or a Tourism film. Especially important is active User guidance to incorporate - for example, with:
A 360° video should not stand in isolation, but be part of a Cross-media strategy itself: embedded in a Landing page, linked via QR Code, supplemented by classic content such as PDFs or Photo Galleries.
360° videos are not an end in themselves. They only fully unfold their effect when they are integrated into a clear Usage context embedded are – technical, in terms of content and strategic. Whoever is interested in Goal, Platform and User guidance Makes you think, achieved more sustainable impact.
A 360° video without any form of Interaction is quickly consumed – but just as quickly forgotten. Especially with longer content, Educational videos or Presentations purely passive experiences often seem tiring. In addition: without interactive elements is lacking Structure, Orientation and Room for maneuver for the viewers.
While classic videos through Cut, Chapter or Playlists will be structured, this is missing Navigation level in many 360° Productions – while current tools have long offered numerous integration options Interaction, Navigation and User guide.
Why interaction should be the standard today:
With interactive hotspots can be Additional information place directly in the room - e.g. Text boards, Photo Galleries, Audio commentary or External links. These can time-controlled appear or by Eye control or. Click activated.
Technically feasible with:
Example: A virtual showroom displays machines - clicking on a hotspot opens an info window with technical details or product videos.
Right now multi-part or location-based content (e.g. Real estate, Exhibitions, TrainingThere are several ways to navigate between scenes. This can be done by Menu bars, Chapter markers or Jump links succeed.
Advantage: Users can jump to specific points instead of watching a long video linearly.
Especially in Educational sector increases the involvement of Quiz questions, Decision paths or short Knowledge inquiries attention and learning effect. Even with Training videos in companies, for example. Security or Comprehension questions to be built in.
Implementation with:
A 360° video can be watched on very different platforms Desktop, Tablet, Smartphone, VR headset or integrated Kiosk Systems. Depending on the output medium, the Interaction to be adapted
| Device type | Recommended Interaction |
|---|---|
| Desktop | Mouse click, scroll, UI buttons |
| Smartphone | Touch gestures, motion sensors |
| VR headset | Gaze control, controller selection |
| Web Kiosk/Tablet | large touch zones, visual menus |
Tip: Test your interactive 360° video on all target devices – ideally with real users – and optimize the Operating logic accordingly.
Many providers now also offer Tracking Features – something like which Hotspots how many times it was clicked, which Scenes how long was looked at or when a Video was aborted. This way the Success one 360° Experience measurable.
A 360° video without Interaction remains passive — and gives away a lot Potential. Modern tools today enable a variety of interactive elements, without needing programming skills. Who Navigation, Hotspots or simple User guide specifically deployed, not only ensures better User experience, but also makes its content Sustainable and structured accessible.
While a lot of effort is put into the visual appearance one 360° videos is inserted, remains the Your often an afterthought. However, especially in immersive environment die Spatial sound perception a central element. If it's missing or poorly implemented, the experience feels flat, artificial, or even irritating.
Typical problems range from mono recorded sound, who comes „ out of nowhere“, about unintelligible language up to missing synchronization between Image direction and Sound source. This is particularly critical for VR headsetsWhen the Head moves, but the sound remains static, breaks the Immersion immediately.
Why 360° Audio Is More Than Just Good Sound
For real Spatial sound perception will the tone ideally ambisonic recorded. Ambisonic microphones how that Zoom H3-VR, Sennheiser AMBEO VR Mic or RØDE NT-SF1 enable the recording of a complete Sound ball (First Order Ambisonics). The advantage: The Tone direction later dynamic to the Gaze direction adjusted.
Tip: Upon admission, Positioning pay attention to Microphone should be as close as possible to the Camera stand without getting in the way.
Instead of focusing on the Camera Micro to leave, it is advisable to, Language separately with Lavalier or Shotgun microphone to incorporate. These Sound tracks can be targeted later in Mix place and edit. Especially with Interview scenes or explanatory passages, this is crucial for the Understandability.
Ambisonic audio can be found in software such as Reaper with Ambisonics Toolkit), FB360 Spatial Workstation (Meta) or DaVinci Resolve Studio professionally post-process. In this process, each Sound source spatially in the 3D space positioned and on the Movement the Camera or of Head be voted on.
Recommendation: Before exporting, check if the selected Output medium (e.g. YouTube, Meta Quest) the used Audio format correctly supported. Ambisonics In YouTube, for example, it only works in combination with certain Metadata (Google Spatial Media Metadata Injector).
Background noise, Room acoustics and Environmental noise should be consciously recorded and designed. The goal is not „perfect studio sound,“ but rather a credible soundscape, that fits the scene. Also Sound design (e.g., Fade in atmospheric sounds, Music, acoustic cues) contributes to Immersion bye.
Right now VR applications should the tone be neither too ocean still some quiet to be. Extreme Dynamic differences lead to Language goes down or Ambient noise feel uncomfortable. A clean Mixture with adapted Dynamic Compression is therefore essential – especially for Headsets with small Speakers.
360° Audio is not a bonus, but a integral part immersive content. Whoever good sound or neglects it, risks that even excellently filmed scenes will lose their Effect lose. Today's Technology allows it even without a large sound studio, with manageable effort spatially impressive sound to generate that the Overall impression significantly enhances.
Many Beginner are worried about the File size from 360° videos – especially if they are in high resolution like 4K or 8K produced. In reality, file size itself is not a problem, but rather depends heavily on the Purpose of use ab. It only gets critical when the video local on a Website embedded on a Mobile headset run or too many Resources when playing.
But: Who 360° videos via YouTube or Vimeo delivers, must take care of Compression hardly matter. These platforms take care of that Encode automatically for different bandwidths and devices. This means: Even large Raw files are optimized and streamed there in the backend.
When compression really becomes relevant:
If possible, use platforms like YouTube, Vimeo360 or the native Video Integration in hubs like Matterport, 3DVista or SeekBeak. They take on the burden of Optimization including Resolution, Bitrate and Streaming quality.
Bye local playback – above all Headsets is the Codec crucial.
On modern headsets, such as the Meta Quest 3 or PICO 4 Enterprise is H.265 plays back without major problems – on older devices like the Meta Quest 2 is often a limit on 4K, 60 Mbps and certain Container formats (MP4/MKV).
The optimal Compression differs from Headset to Headset. A file that on the Quest 2 stutters, runs on the Quest 3 perhaps butter-soft – and vice versa. Best:
While Adobe Media Encoder solid groundwork leads to Open-Source Tool FFmpeg often better results – both in terms of File size as well as Playback behavior concerns. Those who prefer to graphical user interface works, can use tools like FFBatch use. There you can find ready-made Presets use or own Profile to set up. Particularly helpful are the many Forums and Online Resources, which has already been tested FFmpeg Commands to provide for common VR devices.
Recommended compression tools:
Tip: A 360° video, which is compressed too much, loses Detail, works Muddy and frustrated Spectator. Better a few seconds Loading time to accept – and for that the visual impact Receive.
File size is no problem – if you your Playback path know. For Streaming platforms takes over the Technology the work. For VR and Local scenarios Is a clean worthwhile Compression Workflow with H.265 – ideally tested and adapted for the respective Headset.
Since the viewer determines the direction of their gaze, subtle guidance is important. Sounds, movements, or light effects can direct the gaze. Storytelling should be conceived spatially—with events that logically follow one another and make meaningful use of the space.
Yes. Experience shows that 360° videos between 2 and 5 minutes are most effective, depending on the topic. For longer content, a clear structure with chapters or sections is helpful. What's important is to give the audience time to look around.
Because the viewer chooses their own viewing direction – sudden cuts lead to disorientation or motion sickness.
A narrative concept in which the plot is staged through movement, sound, or light in space, rather than through classic camerawork.
H.265 delivers better quality at a smaller file size, but it's not fully compatible on all devices and browsers.
FFmpeg (command line), FFBatch (GUI), or Adobe Media Encoder – depending on your needs.
A good 360° video requires planning. With a little knowledge and experience, many typical mistakes can be avoided. Whether it's a marketing video, VR training, or an immersive educational journey – the right techniques and dramaturgy will ensure a captivating result.
Design4real Happy to support you with the planning, shooting, and post-production of your 360° project.

Are you interested in developing a virtual reality or 360° application? You may still have questions about budget and implementation. Feel free to contact me.
I am looking forward to you
Clarence Dadson CEO Design4real